Back in the Saddle Again: And other appropriate idioms

We’ve taken two years off from this hobby of beekeeping. One year because we had just moved into our new house and were preoccupied with unpacking and getting our chickens back into a new coop, etc. Last year, February came and order forms and Facebook posts popped up about ordering nucs and packages and neither of us felt up to the challenge. Having had a year off, we felt out of the routine. Things were packed away, boxes were covered with snow. Neither my husband nor I felt interested in digging everything out and remembering where we had left off.

This year was different though. This year, the absence felt like an eternity. Both my husband and I felt anxious and excited about getting back into the routine. We dusted off bee suits and veils and cleaned up our smoker. I ordered a nuc from a friend who winters his bees in Pennsylvania and we were back in the game.

The nucs arrived on a typical spring day in Michigan: cold, windy, changing mix of rain, 56896984_10218869594472578_6625206372290002944_nsleet, and even snow. We excitedly picked up our nuc box then came home and set it on the front porch for the time being.

And then a week went by. We have lambs now and my husband has been furiously working to finish the fence in the pasture. We had intermittent days of rain, wind, and cold. And so the nuc sat, on the front porch.

But then, Easter weekend, we had the most glorious spring weather. Full sunshine, temps in the upper sixties, low seventies, and that nuc was buzzing with activity. We told the 20190415_113850
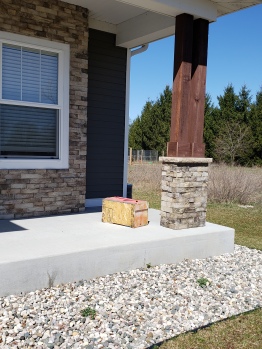
kids the front corner of the house was off limits until we had a chance to install the nuc. We excitedly stood by and watched the bees circling and flying their figure-8s, acquainting themselves with their new home. All day Sunday, as my husband and I passed in the yard while doing other chores we’d say, “We gotta get those bees in tonight.”

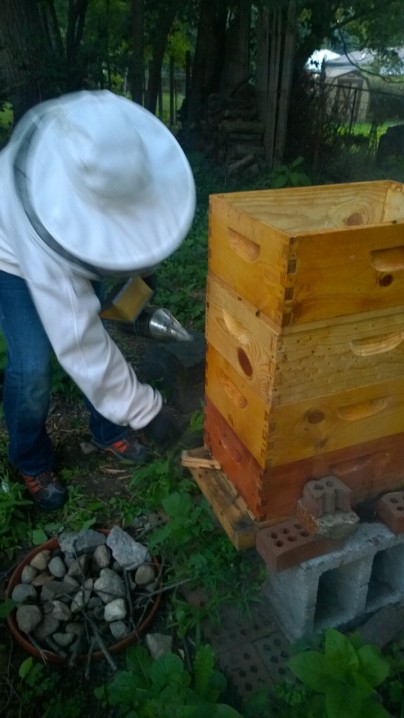
Now, working with bees at dusk can be a little tricky. The key is to wait until the evening to move or install them because then everyone is home. (During the day, many bees are out working) However, too late and the bees are real cranky. Rather than fly around, they crawl around, and bees that crawl on you are bees that get tangled up in your clothing and, thus, sting you. Crawling bees are exceptionally good at working their way under cuffs or the waistband of jackets – if you aren’t properly protected. We learned this the hard way a few years ago when we picked up a hive 3 hours away. By the time we got there, it was dark and those bees were NOT happy. My husband received about 15 stings to prove it.

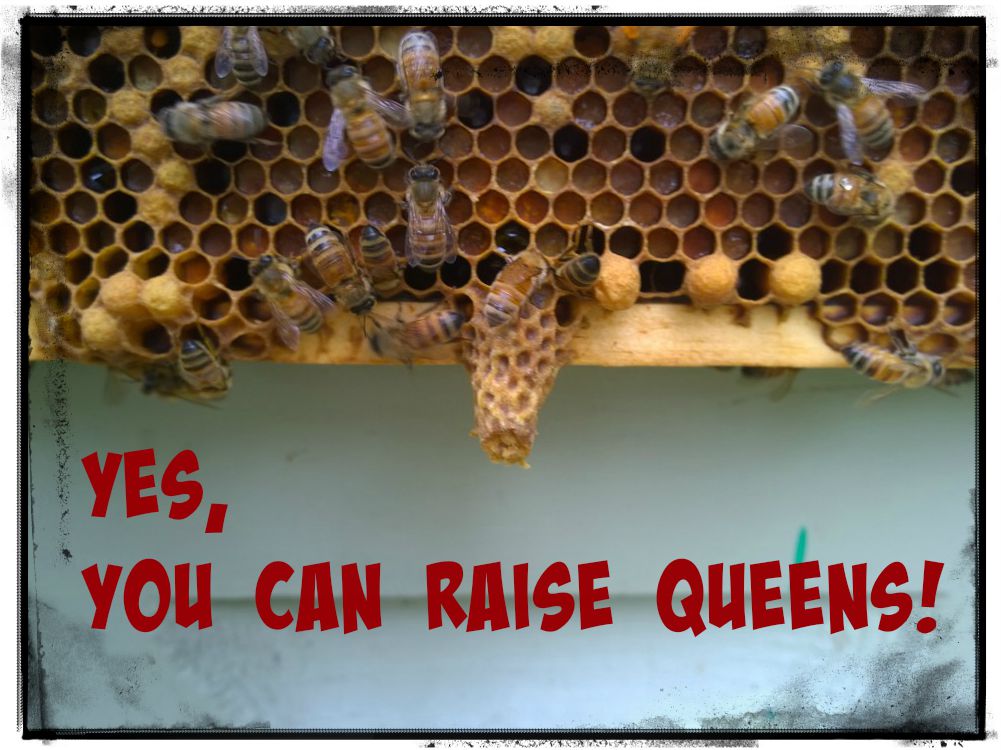
This year, my husband tackled the install on his own because I was on bedtime duty with the little ones. I hung around for the first 2-3 frames and then headed inside. About 10 minutes later, he barged in (looking a little wild-eyed) and said, “are there any bees still on me?!” I did a quick search of his shirt and pants, declared him clear and then said, “What the heck happened after I left?” It turns out that, due to propolis and comb shape, the frames didn’t fit tight into the box. As he chiseled and wiggled, it became increasingly darker and, well, the bees emerged!  He said, it was like a switch, all of a sudden, they were crawling all over him. He had a smoker with him, but he was already in too deep at that point!

In the end, he earned 7 stings – from his neck, to his belly, to his ankle. And just like that, we were back in the beekeeping game. As the summer goes on and we feel more confident in our abilities and hives, we tend to wear fewer and fewer items of protection. Two years ago, my husband was down to only wearing a veil. He was surprised to find that that confidence and ease with which he once knew, did not come right back to him. He did wear his beekeeping jacket and veil this evening, but not his suit or gloves, hence the many points and entry and, ultimately, all the stings!

I’m a high school English teacher and this week my senior class is studying cognitive biases. We watched a video from the Smarter Every Day channel about riding a bike. In the video, Destin (the host) demonstrates how he was able to reprogram his brain in such a way that he was unable to ride a bike again. It takes him 8 months to do this. When he attempts to relearn, he is able to do this in a mere 20 minutes. It was interesting timing: just after teaching this lesson my husband said, later that night, “Guess beekeeping is not like riding a bike. I feel like a rookie again.” I can only assume we will be back to our confident ways in no time. After all, reverting back to a path your brain has already created is much easier than learning something new… In the meantime, I think I’ll pick up some extra Benadryl from the drugstore!

Saskatraz Bees!

Last summer was my last post because my family was building a new house! While construction took place, we lived in an apartment (with my two wild boys and enormous dog).

We tried to keep a hive going at the site of our soon-to-be home, but it was difficult to manage due to the location and everything else going on. So I’m happy to report that we are now moved into our house, a bit unpacked, mostly organized and ready to get back into the swing of things.


Our new house! This was taken last spring. We have a driveway, a yard some landscaping now!

My husband has really been reading up on Slovenian bee houses, so we talked about taking a break this year to build one and then getting some bees again NEXT spring. Anyone have any experience with these?

But then AWS Bees called and asked if we wanted to order any packages. I told the man on the phone that we weren’t sure yet and he informed me that they are excited to be offering Saskatraz bees this year. So now I’m thinking, “What?! A new breed of bee to play with? I’m in!” I’ve done just a bit of research on these new-to-me bees and thought I’d share. If anyone has any experience, I’d love to hear about them in the comments!

Saskatraz bees are being sold exclusively by Olivarez Honey Bees (OHB). OHB has apiaries across Northern California and Hawaii and according to a recent Bee Culture article, owner Ray Olivarez, Jr., “breeds 180,000 European, Carniolan, and Saskatraz queens every year, and 100,000 more at their Hawaii operation.” The strand comes from Saskatchewan, Canada (hence their name) and Olivarez has been breeding Saskatraz for almost 10 years.

The breed is supposed to show varroa mite resistance and more hygienic qualities (similar to Ankle-biters). Additionally, they are selected for honey production, wintering ability, temperament, and improved disease resistance (including brood diseases) and have now made their way to bee distributors around the country.

Both the increased mite resistance and ability to overwinter caught my eye first thing. However, in regards to mites, OHB’s website cautions:

In the last 3 or 4 years we have crossed high VSH lines with our naturally selected colonies to try and increase stability of the varroa tolerant trait. This looks to be promising and new lines are currently being evaluated. However, we have also noted that treatment with some synthetic miticides, although initially effective in lowering phoretic varroa infestations, may negatively affect the colonies ability to cope with subsequent mite infestations. Some miticide treatments may also result in increased virus infections, particularly in varroa susceptible phenotypes. (Unpublished data)
link to article

This raises a new and interesting question. It does seem that mite treatments are working and beekeepers (in Michigan, at least) seem to be having better luck overwintering (perhaps because the bees are stronger, minus the mites); however, what is the long term effect of these treatments on our bees? Could they weaken the colony in the long run? At this point, we simply don’t know.

Naturally, I’d love to order a dozen packages and set up some experiments. I think my bank account may allow for me to order a package of Saskatraz and perhaps a local nuc of the Carniolan variety. I will still be able to contrast the two hives, but certainly with findings that small, it would be impossible to make any sweeping generalizations.

Nonetheless, my husband’s hope for a bee-free summer may have just been spoiled!

For more reading material on Saskatraz Bees, check the Saskatraz Breeding Project page for published research findings: http://www.saskatraz.com/

Here’s OHB’s homepage: https://www.ohbees.com/products/ohb-saskatraz-queens

Lappes Bee Supply is also selling Saskatraz Queens: https://www.lappesbeesupply.com/saskatraz-queen-bee-in-store-pickup/

Winter: An Update

We have not had a lot of success in keeping bees alive these past winters. We’ve had struggles with nosema, starvation, and weather beyond our control.  Every year we vow to do something different, and we do, but then something else seems to kill them.

This year we were fairly aggressive in keeping the mite population in check as one of our theories was the bees were weaker than they looked going into the winter months.  We also only took 2-3 frames of honey total (from our then 6 hives), so there would be plenty of honey for the winter months.  Finally, we revamped our wind-block system.

In years past, we’ve seen record colds. One year there were too many cold days in a row for the bees to get out for cleansing flights. One year the well-below zero temps didn’t come until mid-February and the weak cluster just couldn’t sustain. So this year, we upgraded our plan of attack:

winterized hives

  • We moved all of the hives together onto a platform.
  • We surrounded the hives with insulation, leaving holes for entering/ventilation.
  • The platform is sitting on bricks, and through the bricks we ran a piece of heating cable. This way, if the temperature of the brick falls below 34 degrees, the cable will kick on and heat up. Brick is a good conductor of heat, so we’re hoping it will produce enough radiant heat to just take the edge off.

Of course, the year we OVER prepare for frigid temperatures, is the year we have an unseasonably warm winter! So in the middle of December, when the temp is usually in the 30’s, it was in the 50’s and the bees were flying like crazy. This is great for hive hygiene, but more flying means less clustering which means the bees are burning more energy. Naturally, then, they’ll eat more honey.  We need those honey stores to last until at least April, May ideally, so we made some giant fondant cakes and put them out near the hives.

12366439_10208256397989299_5970933198379431825_n-2

In the fall we started with 4 hives and a nuc. We lost the nuc pretty early on and one of the weaker hives, so we currently have three really strong hives. You can see the entrances to each hive below:

winterized hives enterances

Today it’s a balmy 29 degrees and what little snow we have has completely frozen into a hard, slippery ice carpet, if you will. This means that when I went out to feed the chickens and check on the hives, I was able to see evidence of hive cleaning. All those little black dots on the ground are dead bees.

20160102_092022

While you might think this is a bad thing, it’s actually a good sign as it tells us the hives are alive and active. When bees die inside the hive (which happens much more in the winter than summer because they are all cooped up), worker bees toss the bodies out the front door.  Sounds disrepectful, I know, but it used to make our chickens happen when they roamed by the bee hives!

So I will cautiously end this post with a “so far, so good.” As I’ve learned you can never be too careful when wintering bees. Last year we thought it was smooth sailing when we had a living hive in February and then it died out near the end of the month after a cold snap!

Happy Beekeeping!

Preparing for Winter: Part One

Preparing Hives for Winter

Well it’s that time of year. The leaves are changing, the nights are cooler, and the bees are preparing for winter.  Here is an overview of first round of winterizing. In another month or so we will attach insulation and probably change our feeding system, but that’s a discussion for another, colder, day!

We started this process about two weeks ago (I’m running a little behind in the blog-o-sphere).

  • About two months ago we treated the hives with food grade mineral oil as a mite treatment. We’ve been using the powdered sugar method all summer, but wanted to do one last “big” push. The husband has been reading about a method to use a diffuser that basically sprays a fine mist of oil over the bees. It doesn’t hurt them and the mites fall off and die.  After our first attempt, the bottom boards were COVERED with mites. I was worried about the health of the bees, but we’ve treated twice and they seem to be just fine. Some people don’t like this method because mineral oil is a petroleum-based product, but I figure if we’re only doing it once or twice a year it’s still better than those chemical treatments on the market.
  • Most recently we headed out to evaluate each hive. We lifted the corner slightly to determine weight (heavier means more honey) and, since we were out on a sunny, but cool day, we opened the hives only to do a quick inspection of honey stores and general health. Hive populations start to slow down this time of year because the workers kick out the drones (who then freeze and die). I know that sounds harsh, but consider that drones only hang out, eat all summer, and carry mites AND they only really have their sperm to offer the world, so hit the road, boys! As we evaluated each hive, we made notes of which seemed weak, too small, or lacking in honey. We’ll probably feed all the hives all winter, but we want to be especially vigilant with the weaker ones.
  • WP_20151025_14_23_08_Pro
  •  Speaking of weaker ones, we had two nuc hives that we combined to make one larger one. We did this with the newspaper method. This method is pretty simple: combine a small/weak hive with (ideally) a larger/stronger one by killing (or relocating) the queen in the small hive, then stacking the weaker hive on top of the stronger one with only 1-2 sheets of newspaper between the two. Over the course of the next few days the moisture will soften and tear the newspaper and the bees will work their way through and merge in an harmonious fashion.  We’ve never had any problems with this method, so we did this with two of our weaker nucs.

Another benefit of merging small hives with large hives is the more bees, the larger the cluster that forms in the winter and more bee bodies means more heat. We were also able to pool honey resources this way.

  • During this time we moved one of the hives that’s in a shaded part of the property into full sun. This time of year makes for warm days and cold nights, but we were worried that a hive in the shade all day wouldn’t warm up and dry out during the day.
  • Additionally we made sure everyone had food. This time of year we feed a 2:1 ratio (sugar to water), so the consistency is thick and syrup-like (like honey). This time of year flowers are few and far between and EVERYONE (bees, wasps, yellow jackets, etc) is in the market for food. Thus it is primetime for robbing. When we worked the hives we found all sorts of evidence of these food battles: beheaded wasps, bees fighting bees from other hives… Food supplies away from the hives can help keep other pollinators away from your bees and feeders INSIDE the hives will help keep your bees in their own place.
WP_20151025_14_22_34_Pro

This is my husband and 6-year-old headed out to feed the bees. The little one in the red jacket is my 2-year-old who thinks he’s going too, but we don’t have a tiny bee suit for him… yet!

  • Finally, we have one hive that we got when a friend’s neighbor cut down a tree. We’re going to attempt to overwinter this hive in the log, so we covered the top entrance and filled the two side entrances with straw. The bees can still fit in and out, but it keeps the entry point smaller which (1) reduces robbing and (2) helps insulate the vulnerable hive.
This is Shawn inspecting his hive. He is the one who called to tell us he had found the swarm!

This is Shawn inspecting his hive. He is the one who called to tell us he had found the swarm!

We have a few things on the to-do list before we can consider the hives officially winterized. As I mentioned earlier, we will insulate the hives and continue feeding. This year we are heading into winter with 8 hives, so we’re thinking about doing some experimenting. We are thinking of moving all of the hives close together and next to the chicken coop (sheltered from the wind) and I would like to try and overwinter one INSIDE the coop, taking advantage of the heat the chickens give off.

So that’s the state of the apiary this week, things are winding down. In the meantime, enjoy the most recent bee-related artwork from my little one:

WP_20150922_17_07_45_Pro 2

That’s One Way to Catch a Swarm…

catching a swarm in a log

About a month or two ago, I got a call from a friend (we’ll call him Shawn) who said he was sitting on his deck and realized there were bees swarming overhead. He sent me a video and the activity definitely looked like honey bees, so we headed over to see if we could find where the swarm landed.

After a few minutes of scanning the trees, we found it:

swarm in tree

Unfortunately, this is the swarm in relation to the ground!

swarm from ground

We weren’t desperate enough to rent a lift (yes, we’ve done this before), so we put two hives (one on the garage roof and one on the house roof). We put some drawn comb and honey in the boxes and a little lemon grass oil to sweeten the deal. The next day Shawn told us that the swarm was gone from the tree and he had seen a bit of activity in the hive above the garage.  We were so excited and I’m sure I prematurely celebrated on Facebook. When we went to retrieve said swarm, we found the box empty. Oh there had been activity alright, they robbed out all the honey!

So fast-forward to last Wednesday evening when Shawn messages me again to say, “I think I found your bees.”  The tree in the photo had been cut down by the neighbors and, currently lying in Shawn’s yard, was a log that seemed to be full of honey bees. I was in a meeting all evening, so I texted my husband who said he literally stopped what he was doing (dinner prep), threw the kids in the car and headed out.

It seemed like most of the traffic was coming in and out of the hole on the side of the log…

swarm log

In fact, this was the view when my husband looked closely inside, so he knew for sure they were living here!

inside swarm log

Once my husband figured out which part of the hive contained the actual hive, he used a chainsaw the cut the log a bit smaller so that it could be moved. He also nailed some mesh screen around both openings to keep the bees inside while in transit:

log ready to move

Then the tough part was getting the thing into my husband’s truck. I wasn’t there, so the men were left to do this without my incredible strength (ha!). They use a dolly to get it to the truck, then old-fashioned elbow grease to hoist it inside. (Hernia while beekeeping, anyone?)

V__4B00

They managed it, somehow. If you look at the picture above, you can see how thick the tree trunk is. I’m not sure there would be any way to move the comb out of the trunk without damaging all of it and we are currently out of unused drawn comb to help sustain them, so, since it’s so close to winter, we decided to leave the bees in the tree trunk and attempt to overwinter them that way. We’ll fill in all the holes except one for extra insulation.

For now, all entrances are still screened except for a small one in the side hole. We also used a piece of lumber underneath to level it as best we could.  Bees will build comb perpendicular to the horizon line, so a crooked hive yields crooked comb!

V__9647

Things brings our apiary up to 11 hives!

Yes, You Can Raise Queens!

Queen Rearing Title

Man, oh man, things have been busy on the homestead. I’ve been up to my eyeballs in peaches, cucumbers, and tomatoes that need canning. We also picked a wheelbarrow full of apples to start our first batch of hard cider. We’ve taken turkeys to butcher, cut back some of the garden… it’s starting to feel like fall is coming. It’s pretty much been business-as-usual in the beeyard, however, but I wanted to share this queen-rearing technique that we’ve been playing around with.

First of all, it seems to me that everyone panics when their queen dies or isn’t laying. Certianly, if your hive is missing a queen and there are no eggs laid, you’re in a bit of a bind, but if you have eggs, the bees will make a queen. This summer we’ve been watching the hives weekly and really learning a lot about the business of raising queens.

As you may rememember, we installed four packages in the spring and two of the packages drifted into the third almost immediately after intallation. It resulted in what we call Mega Hive. We ended up splitting Mega Hive several times this summer, but also watched it like a hawk for swarming. We noticed that they built a lot of queen cups in that hive and then they started actually growing queens in the upper boxes. The queen was still alive and well and laying the most beautiful brood pattern in the brood boxes, so we decided to experiment and cut the queen cells out. We experimented with them by putting them in queen-less splits, or keeping them in queen cages to hatch. Pretty much all of them hatched. A few in the queen-less hives hatched, then the bees killed her, then raised their own. So it’s been an interesting summer, in that regard.

My husband even built this adorable tiny hive with tiny little frames and we’ve been using that has a holding tank for extra queens (one at a time, of course) with a few workers thrown in.

WP_20150731_14_35_46_Pro

About two months ago my husband found a free ebook called I.M.N. System Of Queen Rearing by Mel Disselkoen. This is a variation of The Hopkins Method of Queen-RearingWe thought this method was interesting, so we decided to give it a try.

In order for this to work, you have to use a hive that does not have a queen and you have to remove any eggs that are in there (and save one frame for the process outlined below). If you don’t, the bees will just build comb on the horizontal frame (see below) and raise their own queen from one of the eggs (we speak from experience).
So the first thing to do is fashion a cover that will allow you to install a frame horizontally in the hive:

WP_20150731_14_41_32_Pro

WP_20150731_15_25_03_Pro

In order to do this, you need to use a frame of eggs in comb that is not built off of plasticell. The reason for this (as we learned the hard way) is that it is easier to cut the queen cells off when you aren’t trying to saw through plasticell.  The next thing you want to do is plug the same number of cells as you’d like queens (we went for 14 on attempt #1). My husband made bullet-shaped “plugs” out of wooden dowels, but anything that’s the right size will work (q-tips are another option):

WP_20150731_15_22_33_Pro

Then you sprinkle the entire frame with flour. It needs to be heavily coated. (The photo below was taken mid-sprinkle). The reason you’re doing this is to kill all of the eggs except the ones you want turned into queens.

WP_20150731_15_23_56_Pro

Shake off the excess flour, then remove the plugs, place the cover on, comb-side down, and go about your business.

12 days later, we came back to check our progress and found 10 queens! They are kind of in the frame all over the place (probably because we didn’t do an amazing job of flour-sprinkling), but they are there!

queens

Now, getting them out was a bit tricky because the comb was built on plasticell (live and learn).  First we tried cutting them out with a knife, but that was a mess, so then we used queen cups to kind of cut out circles around each one and then scoop each one out. We did squish a few in the process, but overall it was pretty much a success.

cutting queen cells

So it wasn’t perfect and we lost a few, but it was seriously pretty darn easy. One thing that frustrates me whenever we go to beekeeping workshops and conferences is that it seems like many treat queen-rearing like some advanced skill that newbies better not try and do. Maybe because the people running the sessions sell queens too and your ignorance is their gain! You do need to know that it takes 16 days for a queen cell to hatch and, as a result, you really need to keep an eye on things, otherwise she’ll hatch before you have a chance to move the cell!

If nothing else, one thing we learned is that you might as well try! You never know what you might learn, and if you accidentally squish one, then cut it open and have a mini-dissection! Might as well make it a worthwhile death.

Other Resources to Check Out:

Bush Bees, Queen Rearing

The Hopkins Method of Queen Rearing, Bush Bees

The Hopkins Method of Queen-Rearing, Khalil Hamdan

New Additions to the Apiary!

Transporting Honeybees

On one of the many beekeeping forums I’m a part of on facebook, I happened to stumble across a post from a woman who was having to sell off all of her beekeeping supplies and two hives due to a severe allergy she had developed.  She and I touched base and almost exactly 24 hours later, my husband and I were on a two hour road trip to collect our new hives!

It worked out because it happened to be our wedding anniversary (9 years!), so the grandparents were already planning to babysit. We just finagled an overnight for the boys, threw our equipment in the car, and were on our way!

Now, you have maybe never wondered about when the best time of day is to pick up a beehive and move it, so I’ll tell you! During the day, many of to the bees are out foraging, so it is ideal to wait until dark, then seal up the entrance. This way you gain the maximum number of bees. With the entrance sealed you can transport without fear of losing any. The owner of these bees did not feel comfortable closing them up due to her allergy (and I don’t blame her), so our plan was to arrive at hive #1 around dusk. We knew there may still be a few bees hanging out on the outside of the hive, but most would be inside. The second hive was about 40 minutes from the owner’s home, so we’d grab that one last.

WP_20150812_20_45_09_Pro

I happen to know that bees are kind of cranky around dusk. I know this because I have two small children and sometimes beekeeping needs to happen after they go to bed: around 8:30. We have often joked about hives becoming Africanized after dinnertime (Africanized honeybees are incredibly aggressive).

As suspected, there were many bees hanging out on the outside of the hive. We smoked many in, but we had to just resign to the fact that a few would be outside. The problem with these bees outside of the hive was that they were the first ones to be severely annoyed by our presence. My husband was wearing only jeans, boots, his bee jacket, veil, and gloves and was lucky enough to sustain (earned?) about 15 stings over the course of moving the first hive (mostly through his jeans). I only sustained one sting because, well, I wasn’t the one drilling into the hive! In addition to the time of day, a couple other things ticked them off: (1) the entrance reducer was stuck kind of half in and half out and we really had to yank and pry and jostle to get that out. That seemed to be the first offense (in their opinion). (2) Drilling a covering over the entrance also ticked those few exterior bees off.

hive entrance

Once we got our hands on a bottle of sugar water, and were able to spray them, things calmed down considerably. When misted with sugar water, the bees become much more interested in licking that up than stinging my husband.

We then used ratchet straps to secure the three boxes together:

WP_20150812_20_58_30_Pro

And then we just lifted it up and carried it to the truck…

Moving Hive

We then we headed out to hive #2. This one was in a field and we used our headlamps (set on red light) and the light of car headlights to make the move, so I don’t have pictures.

I can tell you that my husband did include a special anniversary “gift” while we were preparing hive #2. Inside the hive on top of the frames the owner had a feeder. We lifted the top of the feeder off (the jug that contained the sugar water), but the tray that the water drips into was stuck to the hive because bees cover everything with propolis. My husband scooted his hive tool underneath to pry it up and the whole thing flung up, out of the hive, and hit me right in the face. I mean, not really because I had my veil on, but it was full of bees and then my veil was full of bees. That’s what 9 years of marriage will get ya… a face full of bees! haha!

Anyway, in addition, we added additional boxes, frames, feeders, a smoker and many other beekeeping odds and ends to our collection! It was a late night, but definitely a great addition to our growing business.  The apiary is now up to 9 hives in total: 5 complete hives and 4 nucs (mini-hives).

State of the Apiary

State of the Apiary

It’s the beginning of August and this has been a pretty good summer for beekeeping around here. We’ve been busy in the bee yard and here is an overview of our current hives.

(click to enlarge:)

Mini-Hive

Package #1

Mega Hive

Split #1

Queen Rearing Hive

Green Lid

Walk-Away Split

What’s next?

Well, we will probably make another split today. We need to get those eggs out of the queen-rearing box. More splits might come in the future if our queen-rearing experiment is successful. It looks like we will have enough honey to extract one more round in the fall.  We also have a back log of boxes and frames to build. Lots of work to do!

We are also reading and reading about the many different overwintering approaches. Our plan was initially to overwinter several nucs, but now we are considering some different options. More on this to come and also an overview of the queen-rearing, once I get some pictures of how it worked out (IF it works out!)

Backyard Weeds Honey Bees Love

Weeds for Bees

American author and poet, Ella Wheeler Wilcox, described a weed as “but an unloved flower.” I have always loved weeds and wildflowers. Sure I can appreciate the hard work that goes into a beautiful, man-made garden, but I absolutely love wild fields and meadows where nature’s work is on display.

My husband and I own 2.5 acres and almost two of it is natural meadow (with some trees around the edges). This year, the meadow has filled with these tall, leggy, fuzzy purple flowers. I don’t remember nearly this much of it last year. When you go out and stand at the edge of the field, if you let your eyes adjust for a few minutes, you can begin to see that the flowers are absolutely filled with pollinators; and not just honey bees, but pollinators of all sorts. We have not seen many bumblebees in general this year, but they are certainly busy in the back field. This got me interested in just what this weed is. Interestingly, it’s an invasive plant and one with a bit of controversy.

I’d like to introduce you to Knapweed:

Knapweed

Apparently Knapweed is native to Southeastern Europe. It’s incredibly invasive (which I can attest to, since it has literally covered our back field). It is so invasive that it can smother native plants. Here’s where it gets dicey. It is a incredible pollen and nectar source for honey bees, so there is some contention as to the best course of action for its removal.  Michigan State University recommends replacing it with pollen and nectar-rich native species upon its removal, however, many beekeepers want to just leave it alone. Five different types of insects (flies and weevils) have been released to help control the spread.  Who knew? Here I just figured it was a pretty purple flower. The flower doesn’t look very substantial, but as I said, it seems to attract a vast array of pollinators (bees and butterflies alike), which is pretty interesting.

This brings us to Milkweed:

Milkweed

Two years ago my family was at a fourth of July festival that included a butterfly house for the kids to walk through. The local nature center was selling Monarch caterpillars as a fundraiser and to raise awareness of the declining Monarch population. We bought two (more for myself, than for the little one). We were given two pages of information and directions for how to raise this little thing. This was when I first learned about the importance of Milkweed. For caterpillars, Milkweed leaves provide food and nutrition (this is what we fed ours, in fact). Then, just as the caterpillar emerges as a butterfly, the Milkweed comes into bloom and the butterfly feeds on the nectar in the flowers. Seriously. Isn’t nature amazing? Once I learned to recognize Milkweed I noticed it popping up in my garden. I did pull it out, but only if it was impeding on one of my vegetable plants.

This year, a large section of it sprung up in one patch in an area that didn’t bother us to leave alone. It turned into about a six by eight foot section.  And I’ll tell you, I’ve never seen so many Monarchs in our yard in all of the five years we’ve lived here. Almost every time I look out the back window, one is flitting by. It could be a good year for Monarchs, it could be the Knapweed, but I tell myself the Milkweed can’t hurt! We have to pass the patch of it to collect eggs from the chicken coop each day and I also didn’t know that Milkweed was so fragrant!

So I was out wandering around a week ago and stopped to snap a picture of the Milkweed. As I leaned in to get a picture, I heard a buzzing. Now if you keep bees, it’s a buzzing you’d recognize. Not the buzzing of a singular bee, flying around your head, but the buzzing of many bees. As I let my eyes focus I realized the flowers were absolutely covered with honey bees.  I was so excited that the plants served a dual purpose!  Also, when honey bees work Milkweed, they shake each flower, so that was pretty cool to watch. I couldn’t get many great pictures because of this shaking (well, and because I don’t have a fancy camera), but I did get this one. Finding the bee is kind of like a Where’s Waldo? excercise:

Milkweed with BeeAnyway, I know this is only two weeds in the immensely diverse world of weeds, but they are two that have played a pretty significant role in the make-up of our yard. Currently, the plants are forming seedpods. These will eventually dry out and burst, thus propagating more Milkweed for next year. We are thinking of saving some so that we can start another patch closer to the hives.]

I suggest you find yourself a spare moment around 7:00 or 8:00 at night and a spare field where you can wander quietly and notice the bugs as well as the weeds. It’s really quite relaxing.

A Visual Guide for Extracting Honey: Backyard Beekeeper Style

Visual Guide for Honey Extraction

We’ve learned a lot over our years of beekeeping, however (and to use a tired metaphor), our knowledge seriously represents just the tiniest tip of an enormous iceberg.  Over the years we’ve extracted honey every year except one. We’ve done it without an extractor and with one (borrowed from a friend). One year we extracted about 80 pounds, but this year our plan was to process enough to pay back those who donated to us in the spring and to keep some for ourselves. The rest is for the bees. We may extract in the spring, since there always seem to be frames they fail to find during the winter months.

So I offer this visual explanation of honey extraction with the disclaimer that we are, quite simply, backyard keepers. I’m sure there are fancier methods or smarter methods (by all means, leave me a comment), but know that we do what we can small scale and with a small budget!

Obviously the VERY first step is to gather all the frames of honey you want to process. We decided to do 8 of them.

honey frames

Ok, so then you need to wash all of the equipment and dry it really well. Or, you can take pictures while your husband washes all the equipment, but then he’ll say something like, “Why don’t you dry?” and you’ll feel guilty, so you’ll help too.

Cleaning Extractor

(Please take note of those “America” paper towels. I found them for 69 cents at Aldi’s after the 4th of July. I guess America is only worth full price in June!)

A honey frame is ready to process when the honey cells are “capped” (or sealed with a wax lid, so to speak):

Capped Honey

In order to get the honey out, you have to either puncture the cappings or cut them off. When you have a frame so big and full that the comb extends out beyond the edges of the frame, it’s easier to cut. You can use a capping knife or, if you can’t find your capping knife (cough, cough), you can use a serrated bread knife:

Cutting Comb

If the frame is not so large, you can use this tool (called a capping scratcher) to open the caps:

scratcher 1

Actually, you use this the other way and scoop the comb moving upwards – this photo is a bit misleading. This guy’s got it down.

Anyway, you then put the uncapped frames in the extractor and crank the handle to spin, spin, spin the frames!

Spinning Frames

It’s hard to see, but here are a couple frames after they come out of the extractor. The comb is open and the honey has been extracted out:

Extracted Frames

And then you repeat again and again until you’ve processed all the frames. When you’ve finished, you open the spicket and drain the honey and cappings into a 5-gallon bucket that is topped with a filter.  Now, I carried extracted frames to the back field during this, so I didn’t get any pictures. There are a variety of filter sizes. You can use filters of different sizes (600, 400, and 200 micron). The largest allows the maximum amount of particles (pollen, specifically) to remain in the honey and, obviously, the smaller the screen, the more filtered your honey will be.  Here are the cappings in the top of the filter:

Honey Caps Filtering

Below is a picture of the filtered honey:

Filtered Product

Voila. From here you can use the spicket in the bottom of the bucket to empty the honey into jars!

honey bucket

You’re right if you think, wow that process must be messy. Yeah, it is and it’s sticky, but it’s totally worth it! Plus, when you clean up, the following things ARE allowed: eating any stray honey that has dripped on anything and eating hunks of comb!

Eating Honey

In terms of cleaning up the extractor, frames, and buckets, we put everything out by the hives (not too close so as to attract robbers) and let the bees rob it for a couple days. Then we bring it in and wash it off. If you put the extracted honey frames back in the hive, the bees will have those things cleaned up in no time! This is great if you, like us, hate to waste even one drop of honey. Either we jar it, or the bees get it back!

happy-beekeeping